April 4th, 2025
We are happy to announce that the Spine v4.3 beta has begun!
Our last Spine release brought physics and other great new features that make a big difference for your animations. For 4.3 we'll both add some big new features and make some of the most commonly used Spine features more powerful, plus our usual sprinkling of quality of life improvements.
Below are some of the changes already in the beta. Check out the changelog for the full list. There is more to come soon!
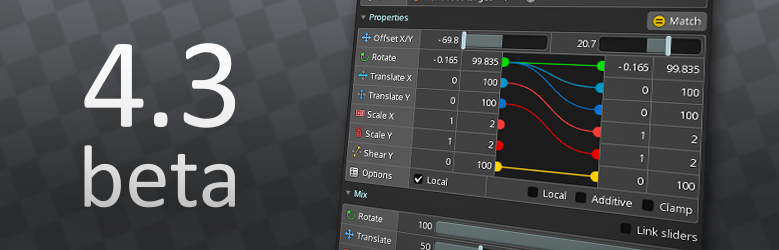
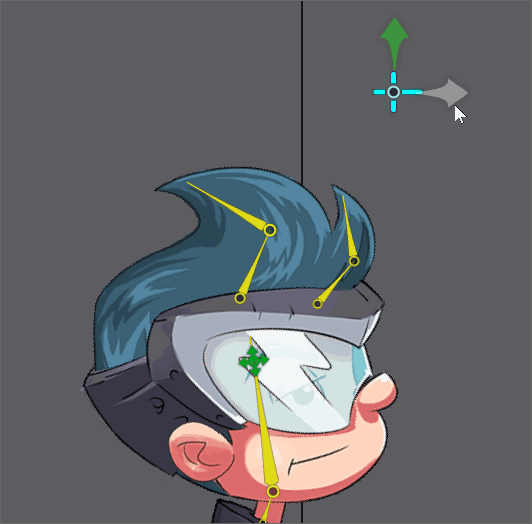
You can now map transform properties to different properties. For example when you rotate or translate a bone, other bones can translate, scale, or shear.
You can "clamp" the constrained bone values so they don't exceed a range. World or local can bet chosen separately for the source and constrained bones.
Transform constraints can also work like they did previously, but better. For example, you can map rotation to rotation, like before, but at a different speed or with clamping.

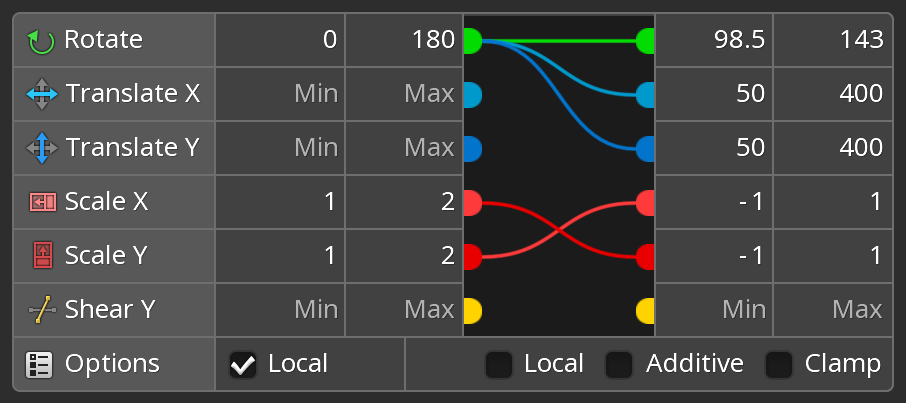
All of this opens up a ton of possibilities for how your skeletons can move automatically! Here translate X is connected to scale X:
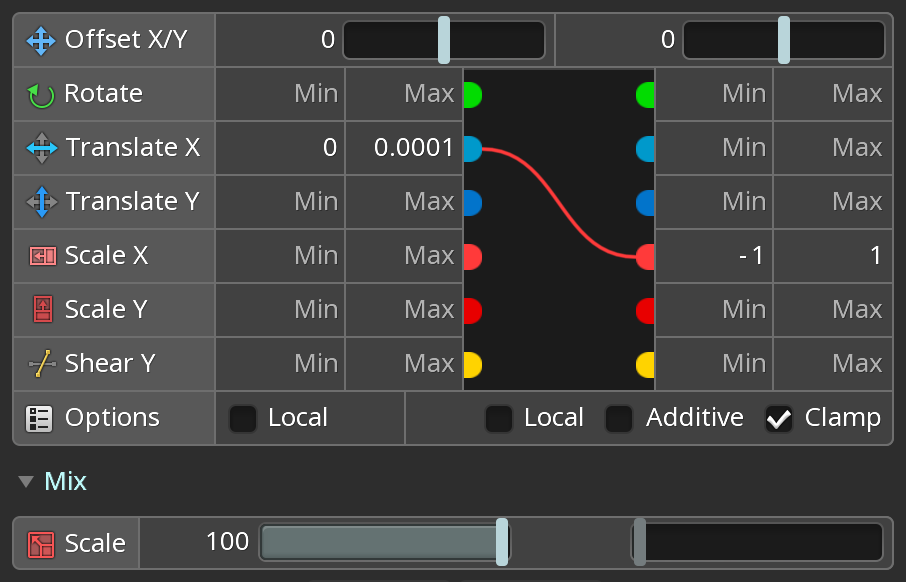
Clamp is enabled so scale can't go below -1 or above 1. Translate X has a very small range, ensuring that scale will be either -1 or 1. The result is that the constrained bone flips when the source bone passes 0:
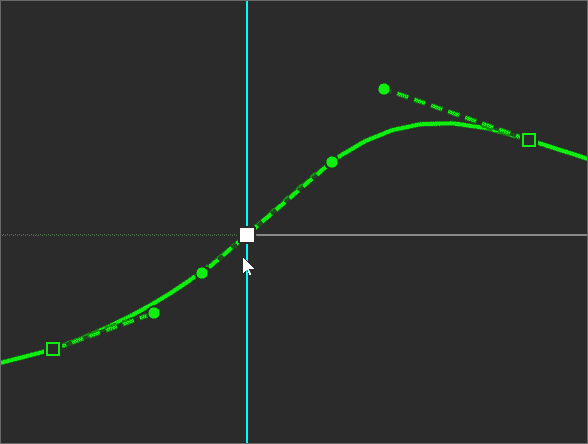
Previously when you moved keys up or down in the graph or you set new keys, Spine would keep your Bezier curve handles static. In 4.3 we are now super smart about adjusting the handles, doing our best to keep your curves intact. That means a lot less fiddling with handles to fix them up after adjusting your keys. One user reports that this speeds up their animating by 200%!
There is now an option when importing a PSD to have Spine delete all images that were previously created by importing a PSD. This prevents old images from being orphaned after a rename, so your images folder stays tidy.
Spine has native support for 100% and 200% UI scale. This works well on 1080p and 4K screens, but may be too small or too large for other sizes, like 1440p. You can set other UI scales, but values like 125% or 150% used to be quite blurry. Not any more! Now all of Spine's text rendering is crisp at any UI scale, allowing you to dial in the size of the UI that works best for your eyes and monitor size.
The texture packer has always had a Fast setting that packs less tightly, but gets it done faster. It now gets it done much faster. In some cases, 8X faster! Not only that, but it also packs much more tightly than before, sometimes as good as not using Fast. It's worth giving it a try, as faster packing can save a lot of time during game development.
It's a small thing, but you can now set a color on your folders for organization and quick identification.
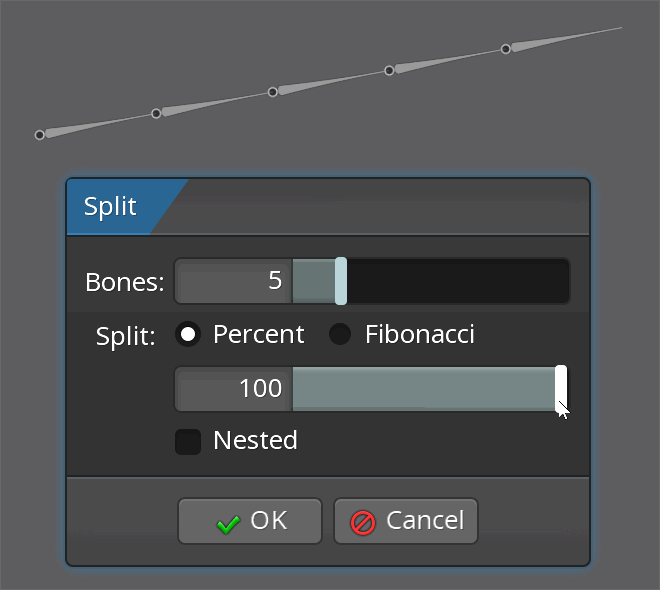
There are now more options when splitting a bone, and the viewport shows the results as you change options.
Give it a try and let us know what you think on the Spine forum. We greatly appreciate your feedback!
March 6th, 2025
If you're diving into the world of 2D skeletal animation with Spine for the first time, you might have come across a common question: How should I prepare my assets for animation? Below are some tips to help you get started and make the most of your animation process.
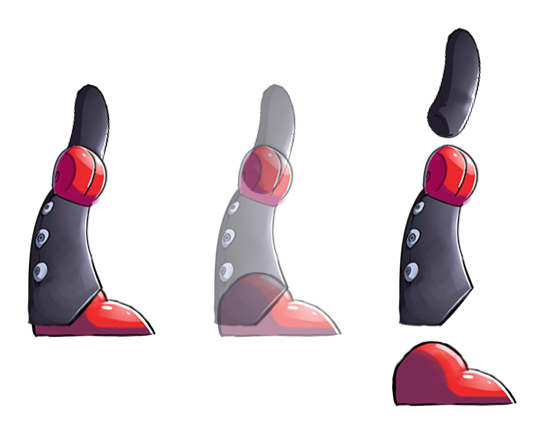
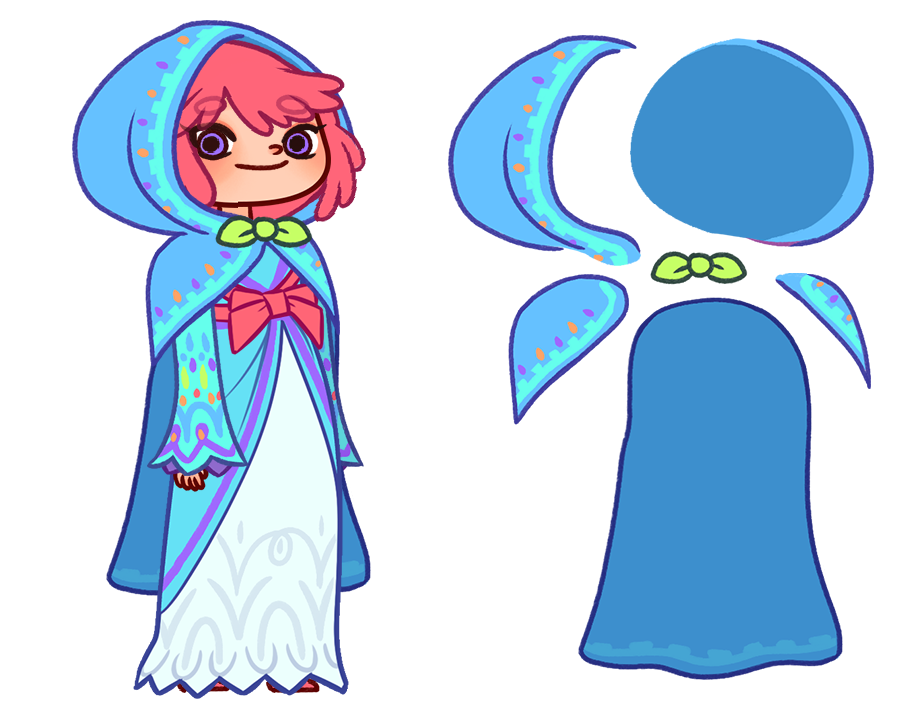
When creating assets, it's crucial to draw even the parts that are usually covered by other assets. For example, if you're drawing hair that's partially hidden behind the head, make sure to draw the entire hair, not just the visible portion. This extra effort ensures that when the hair is rotated or moved, the hidden parts are ready to be revealed without any awkward gaps. This also maximizes the range of motion possible for a given asset.
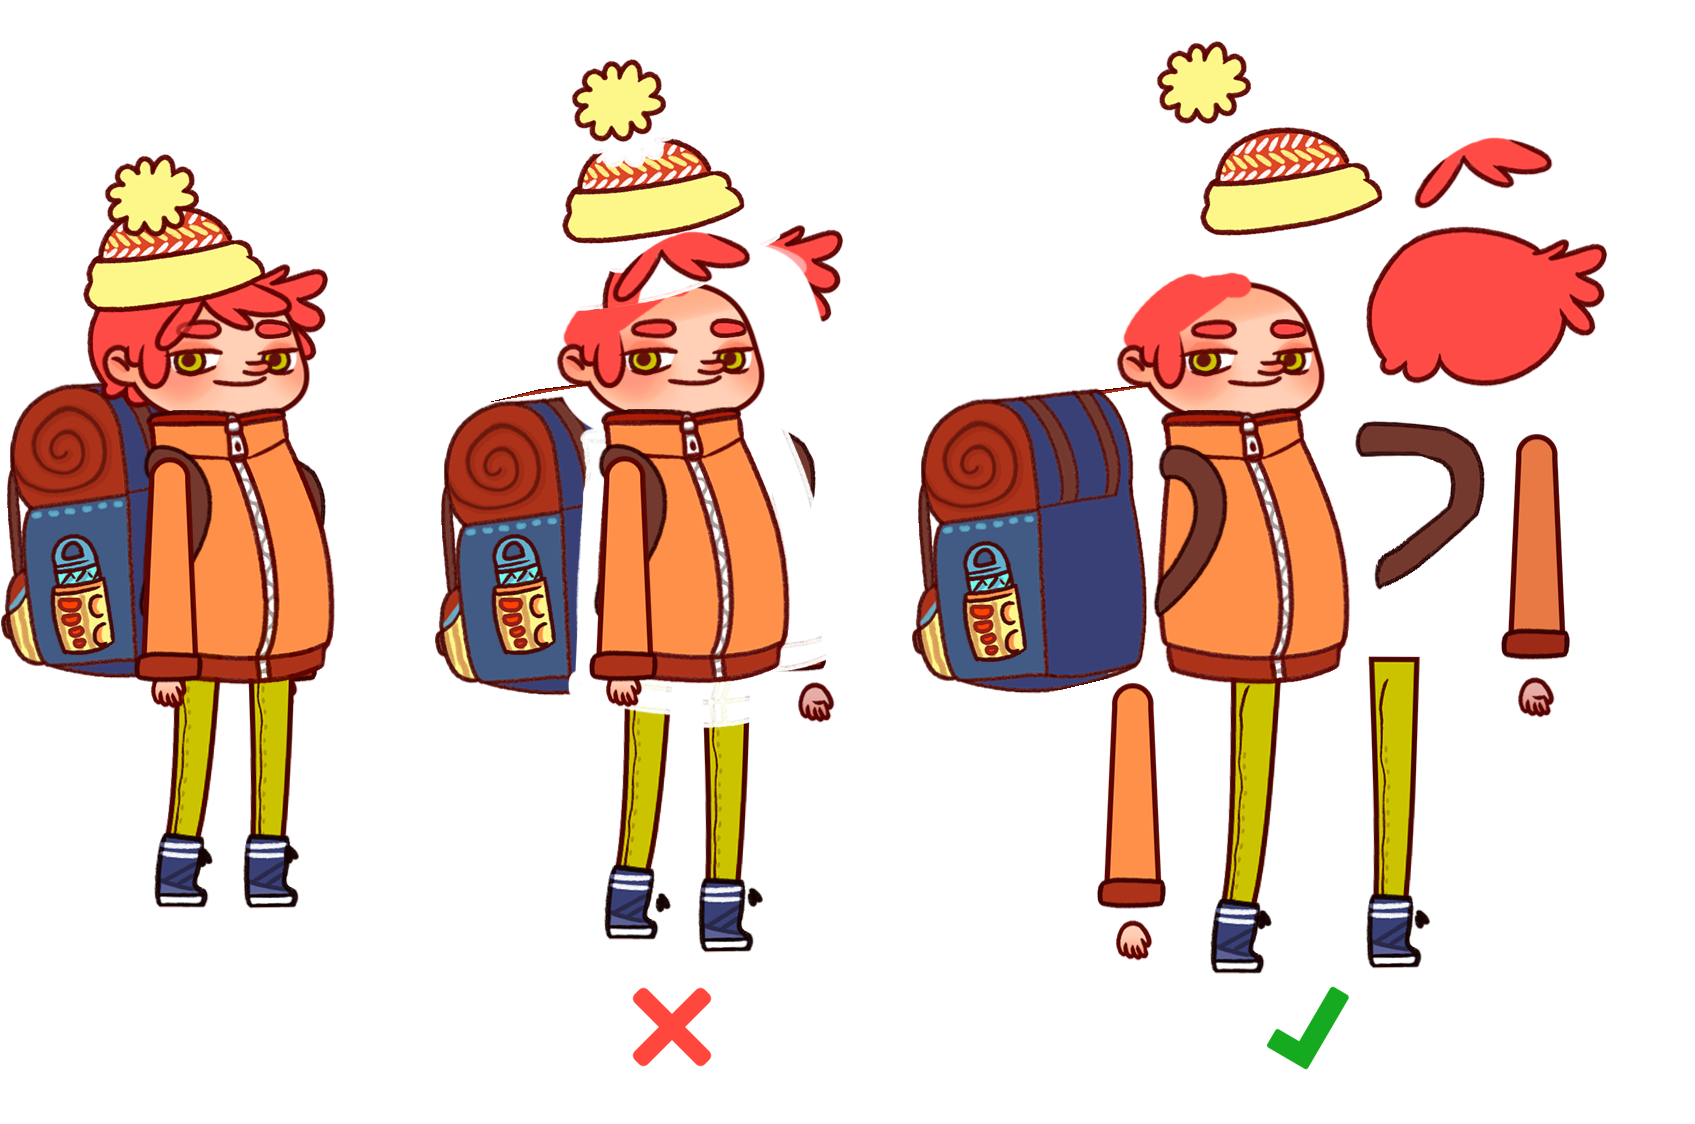
For smooth and natural limb movements, it's essential to focus on how you draw the joints. When drawing limbs like arms and forearms, aim to leave an area as close to a circle as possible where the joints overlap.
Ending overlapping parts in a round way ensures no gaps are shown and maximizes the usable rotation. In general, if you're unsure about how to end a part that overlaps another, rounding it off is usually a safe bet. This is particularly important for parts that need to rotate around their attachment points, such as shoulders or elbows.
When designing assets that need to bend, start with straight images. Straight images can be bent in both directions, giving you more flexibility. Starting with an already bent image and trying to bend it in the opposite direction often leads to unsatisfactory results. If you're unsure about how to straighten something that should always have some curves, such as wavy hair, aim for its most relaxed state, where it is not perturbed by wind.
Additionally, avoid drawing images diagonally, as this can be less efficient. Diagonal images may occupy more atlas space than the same images oriented vertically or horizontally, unless you are using polygonal packing. Also the generate button generates a uniform grid, but this won't be helpful if the image contents are at an angle.

One of the key aspects of animation in Spine is the ability to move parts independently. To achieve this, draw each part you want to animate separately and place it on its own layer. The degree of separation is up to you and depends on how you plan to animate each part. However, remember that without sufficient separation, animating individual parts can become challenging and might restrict your creative possibilities.
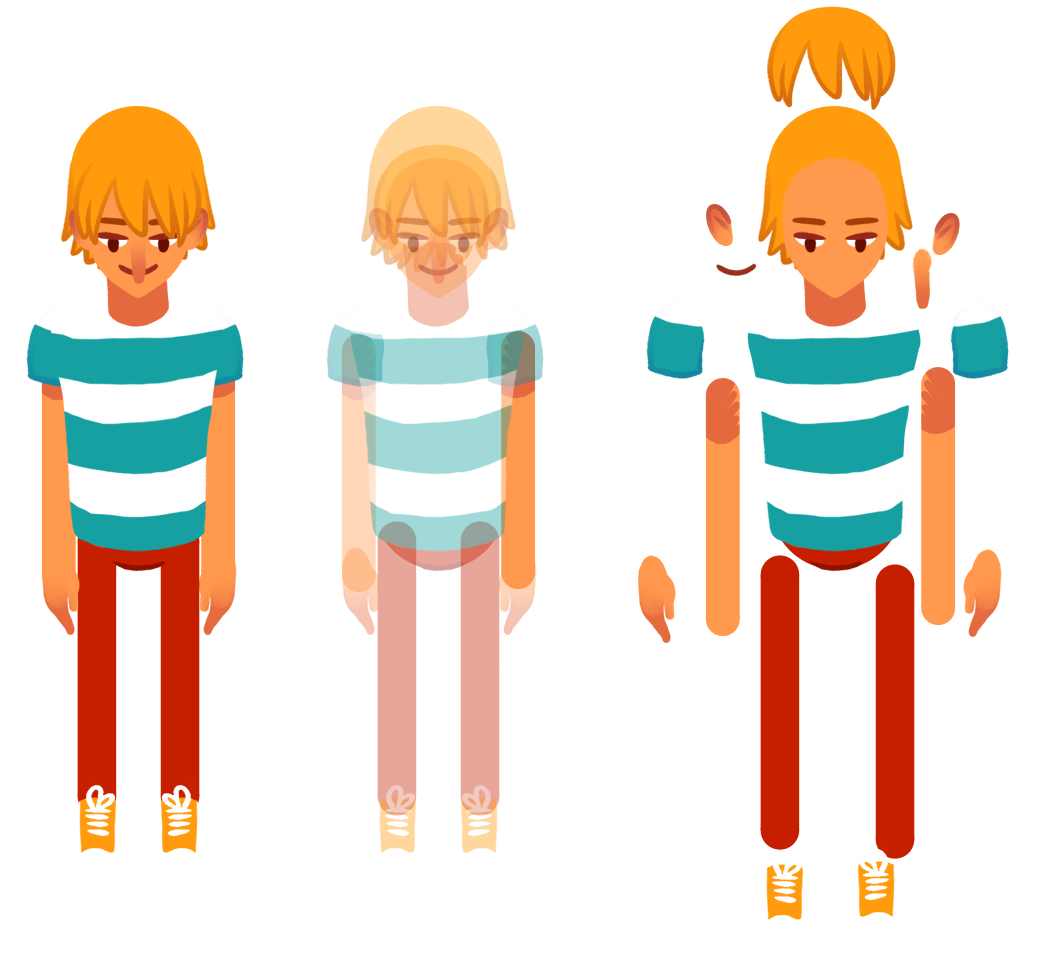
Avoid drawing elements that will appear in front of and behind an object on the same layer. For instance, if you're animating a character with a cloak that moves in front of and behind their body, ensure that the parts of the cloak are drawn on separate layers. If they should connect at a middle point, draw that point on both and, once in Spine, ensure that both have the same weights to tie the images together. Using weld will give you a perfect match!
When working with an art style that has an outline, it's helpful to include outlines both above and below the limb section they should be intersected with. By doing this, you ensure that the outlines are preserved regardless of how the limb is rotated. If you look at the GIF below for example, this technique is used both on the forearm and on the hand. It allows the forearm to overlap the upper arm without merging into it, and it gives the hand greater range of rotation while still feeling attached to the forearm.
Spine can now directly import PSD files. This is much faster than the old PhotoshopToSpine script and allows you to use any image editing software that can write a PSD file. Tags can be added to layers and groups in your PSD, allowing you to manage your assets efficiently outside of Spine and create a streamlined pipeline from your preferred drawing software to Spine. Just add tags to your layer and group names and Spine will automatically process them for you on PSD import.
Make sure the document color space is set to RGB and not CMYK or you may have surprises like duller colors after exporting. And don't forget to add an origin so that adding new assets will be a breeze!
Spine provides a wealth of resources to help you understand how to structure and animate your characters effectively. On the examples page you'll find several downloadable examples of finished characters. Additionally, the Twitch stream files offer live demonstrations and further insights into the animation process. These examples are invaluable for seeing how professional animators organize and structure their assets. The streams are long, so use the filters and chapters to find the information you are interested in.
By following these guidelines, you'll be well on your way to creating polished and professional 2D animations with Spine. Join us on the Spine forum to discuss this post. Happy animating!
March 4th, 2025
This summer we released spine-haxe with support for Starling. Today we're happy to announce that it now also supports HaxeFlixel!
Our new integration allows you to render Spine animations using HaxeFlixel and OpenFL. Haxe, in combination with OpenFL, empowers you to create applications for a wide range of targets, including HTML5 applications and native apps for both desktop and mobile platforms.
Try out our new HaxeFlixel integration by moving Celeste in the demo below:
To get started, check out the spine-haxe documentation and the examples in our GitHub repository. We also invite you to join the discussion about this release on the Spine forum.
February 13th, 2025
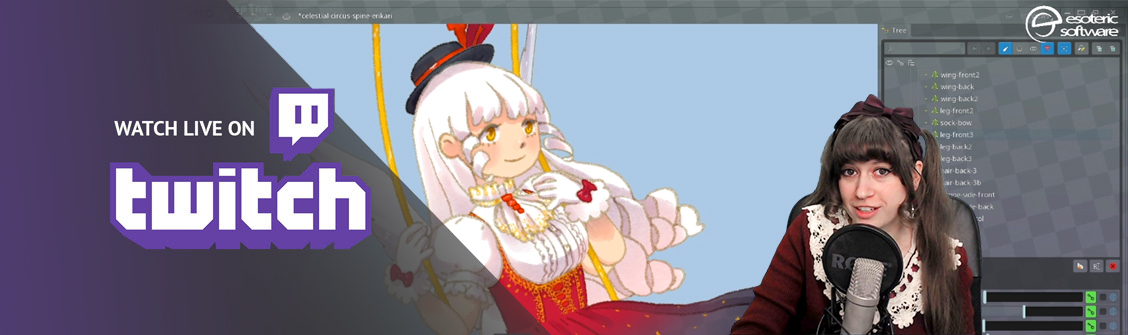
Let's explore App animations in Spine with Erika in a new season of Twitch streams!
To watch live, follow the Esoteric Software Twitch channel to be notified of the start of a stream. Also and check the stream schedule.
If you can't make it for the stream, don't worry! We'll be uploading the recordings on our Twitch streams archive page.
Let us know your comments and opinions on the Spine forum.
